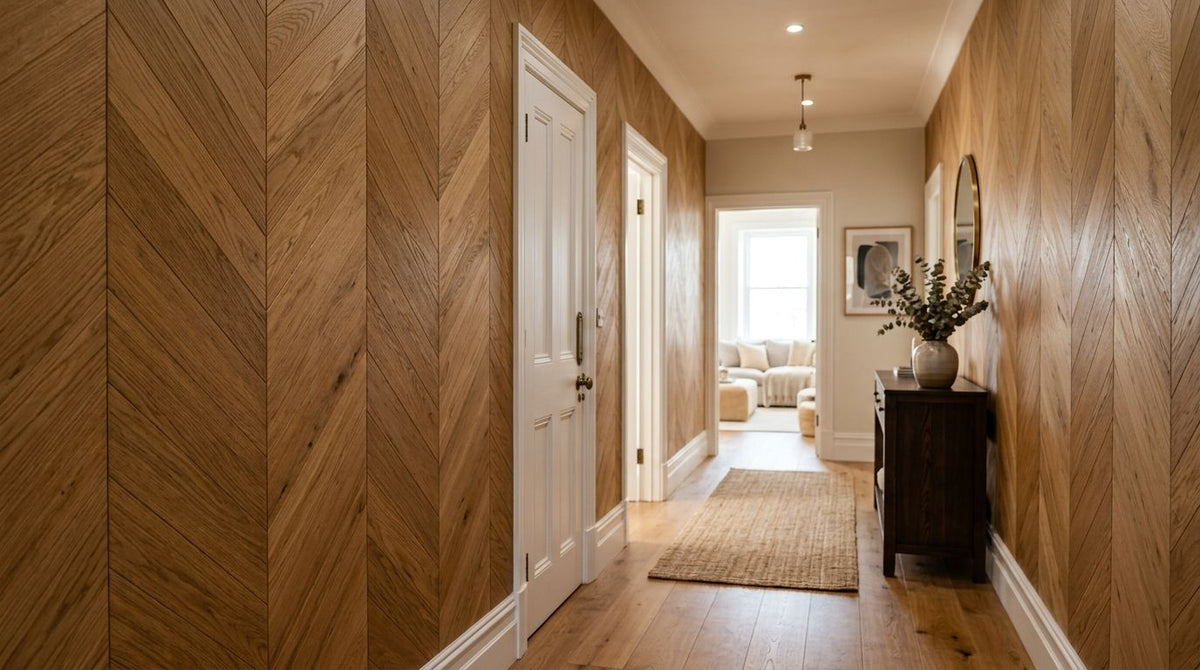
Hallway chevron wood wall panels are angled wood slats mitred to a point down the centre of a corridor wall, fitted with the aim of adding texture and sound absorption to the one room in most UK houses with the least of either. A hallway is narrow, gets walked through dozens of times a day, and usually has bare plaster, a hard floor, and almost no soft furnishing to soak up sound — which is exactly why a flat chevron pattern reads so well there and why the acoustic backing behind the panel matters more than in a living room.
- Chevron wood wall panels turn a plain hallway into a feature wall using mitred AKU Woodpanel oak slats.
- Rustic oak and walnut finishes cut cleanest at a 45-degree angle for a tight chevron point.
- Budget a 10-15% cut-waste allowance when ordering panels for a chevron layout in 2026.
- Skip mitring entirely with 3D decorative wall panels if a full chevron install feels too advanced.
- AKU Woodpanel's 240 cm and 300 cm formats both work for chevron, but 300 cm needs fewer joins.
Why this matters for a hallway
A hallway has three things working against it: hard flooring, a ceiling close overhead, and almost no upholstery to break up sound. Voices, footsteps, and a slammed front door all bounce wall to wall with nowhere to go, which is why corridors feel noisier than rooms twice their size.
A chevron layout doesn't just look sharper than a flat slat wall — it also gives you a chance to run the acoustic felt backing on 3-sided wood veneer wall panels the full length of the wall, which does more for a narrow hallway's echo than the same panel run flat in a wider room. In 2026, hallway feature walls are one of the most searched wood panel projects in the UK, and chevron is the pattern most homeowners ask for once they've seen a flat slat wall and want something with more movement.
How to install chevron wood wall panels in a hallway
The layout is more demanding than a straight slat wall, but it's still a weekend job for anyone comfortable with a mitre saw. Work through these steps in order and don't skip the dry-fit.
Measure your hallway wall and plan the panel count
Hallways are rarely a clean rectangle — door frames, radiators, and light switches all interrupt the run, so measure before you order anything.
- Measure wall height and width at three points; hallway walls are rarely square
- Mark the centre line where the chevron point will sit
- Note every door frame, switch, and radiator bracket on a sketch
- Decide if the pattern runs floor-to-ceiling or stops at dado height
- Add 10-15% to your panel count for mitre waste
Pick a wood finish that suits a narrow space
The manual way is to buy raw oak boards from a timber merchant and finish them yourself with oil or lacquer, matching colour by eye across every board — slow, and hard to get consistent across a long run.
The faster path is a factory-finished panel where the colour is already even across every board. AKU Woodpanel's rustic oak, natural oak, walnut, smoked oak, black oak, and grey oak finishes all come with a real wood veneer face and an acoustic felt back, so you're cutting a finished panel rather than a raw board.
- Rustic oak and natural oak read lighter, which helps a hallway with limited daylight
- Black oak and smoked oak add contrast but can make a narrow hallway feel tighter
- Walnut and mocca work well where the hallway opens into a darker-toned kitchen or living room
- Grey oak suits a hallway with cool-toned flooring or a Scandinavian scheme
- Match the finish to the room the hallway leads into, not just the hallway itself
Set your chevron angle and centre line
Get the geometry right before a single panel is cut.
- Chevron patterns are almost always mitred at 45 degrees on both edges
- Snap a plumb chalk line down the centre of the wall as your reference point
- Decide whether the chevron point faces up, down, or runs horizontally along the wall
- Test the angle on an offcut before committing to a full board
- Keep the same point height along the whole run so the pattern doesn't drift
Cut the panels to a mitred edge
This is the step where most first-time installs go wrong, because a wood veneer face chips more easily than painted MDF.
A step-by-step breakdown of blade choice, tape masking, and cut order is covered in how to cut acoustic wood panels to size — read it before you cut the first board, not after you've chipped one.
- Use a fine-tooth blade to avoid tearing the veneer face
- Mask the cut line with painter's tape to reduce splintering
- Cut one test pair first and check the join before batch-cutting
- Cut both angles of a pair from the same board where possible for grain match
- Keep offcuts — they're useful for end pieces near door frames
Dry-fit the whole pattern before fixing anything
Lay the cut panels on the floor, or prop them against the wall, in the exact order you'll fix them.
- Check every mitred join lines up tight with no visible gap
- Confirm the grain direction reads consistently across the chevron
- Check the pattern clears switches and sockets without an awkward cut
- Number each panel on the back so the install order isn't guesswork
Fix the panels with adhesive and level as you go
Once the dry-fit is confirmed, fixing goes fast — most hallway walls take an afternoon.
A suitable adhesive matters more here than on a flat slat wall, because a mitred joint has less contact surface than a butt joint. Panel adhesive formulated for wood veneer panels holds the mitred edges tight while the bond sets.
- Apply adhesive in a zigzag bead across the back, not just the edges
- Press and hold each panel for the time stated on the adhesive tube
- Check level with a spirit level every two to three panels, not just at the start
- Wipe excess adhesive from the mitred joint before it cures
Finish the edges and joints
The last stretch is where a chevron wall either looks finished or looks like a DIY project.
- Use matching end pieces at door frames and wall returns for a clean edge
- Fill any hairline gaps at the mitre point with a colour-matched wood filler
- Check the join to the skirting board sits flush, not proud
- Leave 24 hours before hanging anything on the finished wall
Chevron wall panel options for hallways compared
| Option | Best for | Key limitation |
|---|---|---|
| Mitred oak slat panels (AKU Woodpanel) | A full chevron feature wall with real wood texture and acoustic backing | Requires precise 45-degree cutting and more waste than a flat slat wall |
| 3D decorative wall panels, no cutting | A geometric accent wall without any mitre work | Pattern is a fixed relief design, not a true point chevron |
| Painted chevron with tape | A rental or budget hallway refresh | No acoustic benefit and shows scuffs fast in a high-traffic corridor |
| Chevron-effect wallpaper | A quick, temporary update | No texture or sound absorption, and corners wear first in a busy hallway |
Mitred oak slat panels are the only option on this list that actually reduce hallway echo while giving you a genuine chevron point — the other three are cosmetic-only fixes.
If mitring isn't something you want to take on, three-dimensional decorative wall panels give a narrow hallway a similar sense of pattern and depth without a single cut.


Common mistakes hallway chevron installs get wrong
- Cutting the first panel before the dry-fit — hallways are rarely square, so a mitre that looks right on paper often needs a small adjustment once the panels are actually against the wall.
- Choosing a dark finish for a hallway with no window — black oak or smoked oak looks striking in photos but can make a hallway with no natural light feel like a corridor rather than a feature.
- Ignoring switches and thermostats in the layout — a chevron point that lands directly on a light switch forces an ugly cut; plan the centre line around fixed fittings first.
- Ordering panels without waste allowance — a flat slat wall wastes almost nothing, but every mitred pair loses material at both ends, so a straight panel count under-orders every time.
- Fixing panels floor-to-ceiling without checking level every few boards — a small lean at the start compounds across a long hallway run and becomes obvious by the far end.
FAQ
What's the best wood finish for a chevron hallway wall?
Natural oak or rustic oak works best in most UK hallways because lighter finishes read better in corridors with limited daylight. Darker finishes like black oak or smoked oak suit hallways with a window or skylight feeding the space.
Is chevron harder to install than a flat slat wall panel?
Yes, chevron takes longer because every panel needs a precise 45-degree mitre cut at both ends instead of a straight edge. Budget extra time for a dry-fit and a 10-15% waste allowance on panel count.
How much wood wall panel do I need for a hallway chevron wall?
Measure the wall height and width, then add 10-15% on top of the flat square-metre figure to cover mitre waste. A narrower hallway with more door frames and switches needs a higher waste allowance than a clear run.
Can I fit chevron wood panels without cutting anything?
Yes, three-dimensional decorative wall panels with a fixed geometric relief give a similar textured look without any mitre cutting. They're not a true point chevron, but they solve the same flat-wall problem in a hallway.
Do wood wall panels help with hallway echo?
Panels with an acoustic felt backing absorb sound that would otherwise bounce between the hard floor and bare plaster in a corridor. A chevron layout doesn't add extra absorption over a flat layout, but it uses the same acoustic backing across the whole wall.
What angle do you cut chevron wood panels at?
Chevron patterns are almost always mitred at 45 degrees on both edges so two boards meet at a clean point. Test the angle on an offcut before cutting a full batch of panels.
Should chevron panels run the full height of a hallway wall?
Full floor-to-ceiling chevron makes the strongest visual statement in a hallway, but a dado-height run works if you want to keep upper wall paint or wallpaper. The decision usually comes down to ceiling height and how much daylight the hallway gets.
Which panel length works better for a chevron pattern, 240cm or 300cm?
A 300cm panel gives you longer boards to mitre, meaning fewer joins across a long hallway run. A 240cm panel works fine for shorter hallways or where you're cutting shorter chevron segments anyway.
One last thing
Most people planning a chevron hallway wall in 2026 fixate on the finish colour and forget the join count — but the number of mitred joints, not the wood tone, is what makes a chevron wall look expensive or amateur. Fewer, longer panels with clean 45-degree points will always outperform a wall pieced together from short offcuts, even in the exact same finish.