


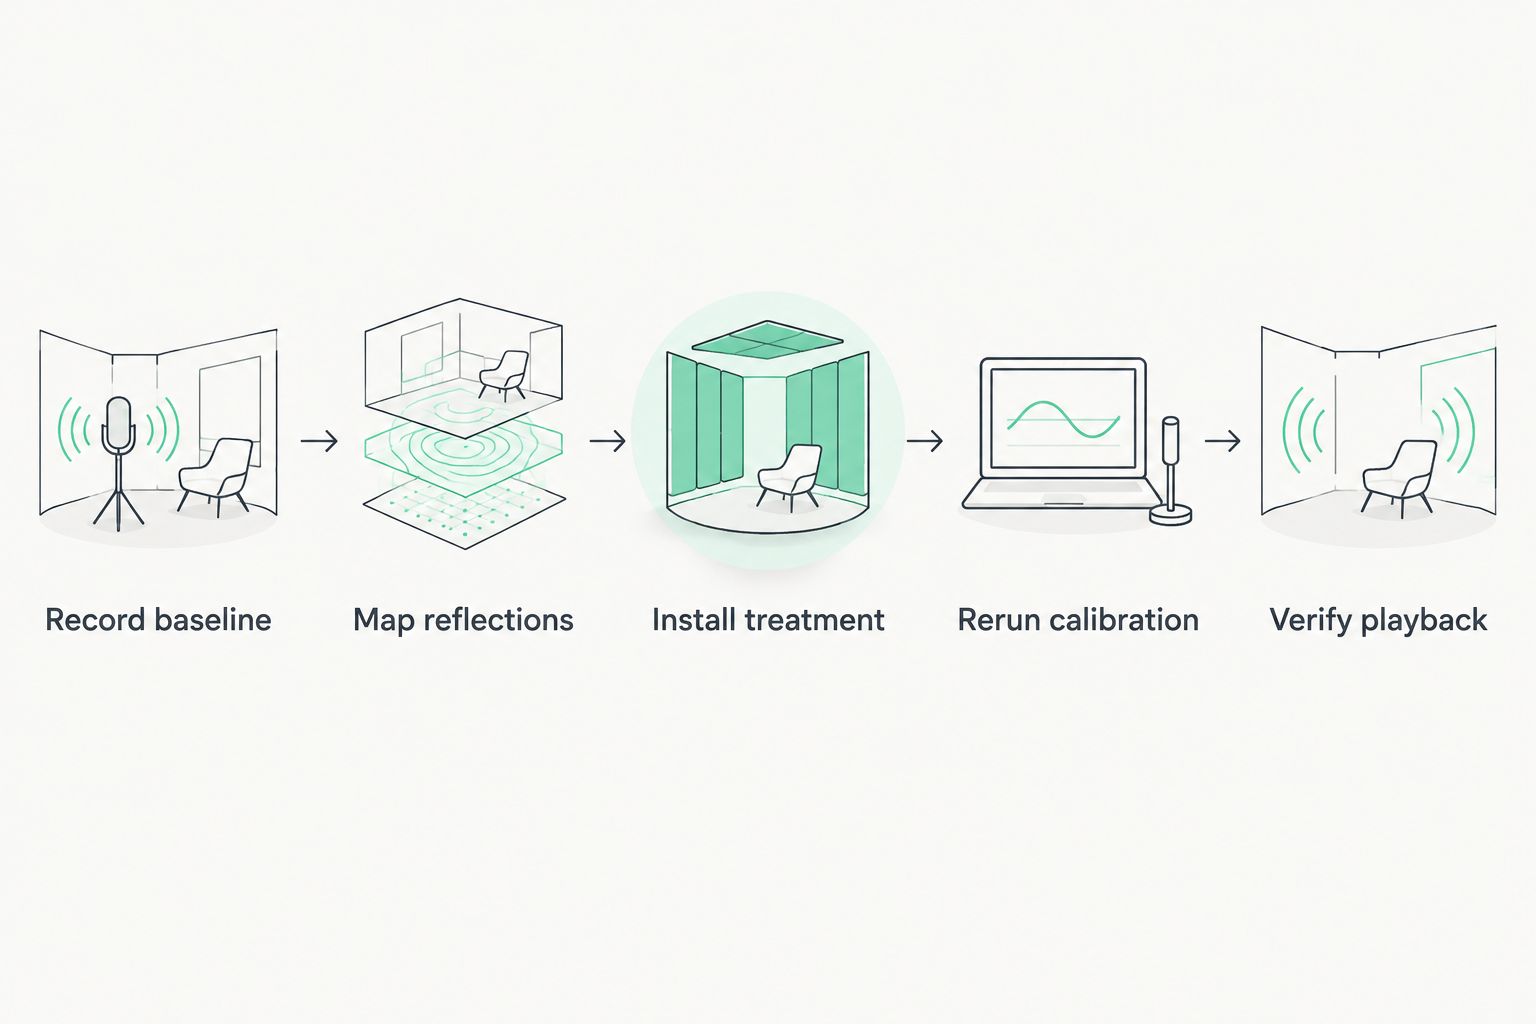
Instead of repeatedly adjusting dialogue levels in an echoey room, integrate acoustic wall panels into your home cinema AV calibration by measuring the room, installing treatment, then rerunning room correction. This 2026 guide explains the sequence for Akustiq UK panels, speaker placement and listening checks without confusing acoustic treatment with soundproofing.
- For acoustic wall panels home cinema AV calibration, install treatment before saving your final room-correction profile.
- Akustiq UK acoustic wood panels suit homeowners seeking wooden wall finishes alongside room treatment; verify the installed assembly's absorption data.
- Room correction adjusts speaker output; acoustic treatment changes how sound reflects within the room.
- Keep microphone positions and playback levels consistent when comparing untreated and treated measurements.
Why this matters
A home cinema has two connected systems: the speakers and the room. Reflections from walls, floors and ceilings reach your ears after the direct sound, affecting dialogue clarity and the sense of where sounds originate.
Room correction adjusts the signal sent to your speakers. It does not remove a reflective wall, and equalisation cannot reliably fill a deep cancellation caused by speaker and seat geometry. Fix placement and treatment before asking calibration to finish the job.
Akustiq UK acoustic wood panels are best suited to homeowners who want a wooden wall finish as part of their room-treatment plan. Their role is distinct from the receiver's calibration system: the panels form part of the physical room, while calibration adjusts playback for that room.
For your 2026 setup, define the problem first. A lingering echo after speech needs a different response from weak bass at one seat or noise reaching the bedroom next door.
Before you start
- Equipment and access: Have your AV receiver's manual, its supplied calibration microphone, a microphone stand and access to its speaker configuration. For independent measurements, use Room EQ Wizard, commonly called REW, with a compatible measurement microphone and its calibration file where supplied.
- Installation materials: Prepare a room sketch, tape measure, mirror and suitable mounting materials. Check the panel installation instructions, wall substrate, concealed services and clearances around equipment before cutting or drilling.
- The gotcha: Acoustic performance belongs to the complete installation, not the wooden finish alone. Check absorption information for the intended backing, cavity and mounting method; a directly fixed panel and a panel over an absorbent cavity are not interchangeable specifications.
Keep the room in its normal viewing condition. Put the sofa, rug and curtains where you use them, and stop avoidable background noise during measurements. A calibration taken in an empty room describes the empty room.
Baseline measurement setup
Record the room and receiver state
- Draw the screen, speakers, subwoofer and listening seats on your room sketch. Measure the speaker and seat locations from fixed references so you can restore them.
- Save or photograph the existing receiver settings. Record speaker assignments, channel trims, distance settings, crossovers and any active listening processing.
- Position the measurement microphone at ear height at the main listening seat. Follow the microphone's orientation instructions; do not assume every microphone should point at the ceiling.
- Establish a comparison state with room correction and optional listening processing disabled where the equipment permits. Use that same state for the untreated and treated measurements.
Do not mix measurements taken with different correction profiles. That would compare both the room treatment and the processing change, leaving you unable to identify which produced the difference.
Expected result: You have a repeatable room layout and a documented receiver state, rather than an impression of how the room sounded before installation.
Capture the untreated response
- In REW, open Measure and select the intended input and output. Load the microphone calibration file where applicable and confirm the signal route before playing a sweep.
- Use Check Levels to confirm that the measurement signal is usable without clipping. Start quietly and increase only as needed; follow the software's level guidance.
- Select the sweep range appropriate to the speaker being measured. For a separate bass investigation, examine 20 Hz to 200 Hz, provided your equipment supports that measurement safely.
- Select Start Measuring. Measure the relevant channels individually, then record the subwoofer and speaker/subwoofer combination when investigating integration.
- Save clearly named traces, such as
2026 untreated centre main seat. Include the channel, microphone position and processing state in your notes.
Check frequency response alongside impulse-response or decay information. A frequency-response graph shows level against frequency; decay information helps reveal sound energy that persists after the initial arrival.
Expected result: Your untreated measurements identify the starting condition. A hand clap can flag obvious flutter echo, but it does not replace measurements or determine bass treatment.
Panel layout and mounting plan
Map the reflection paths
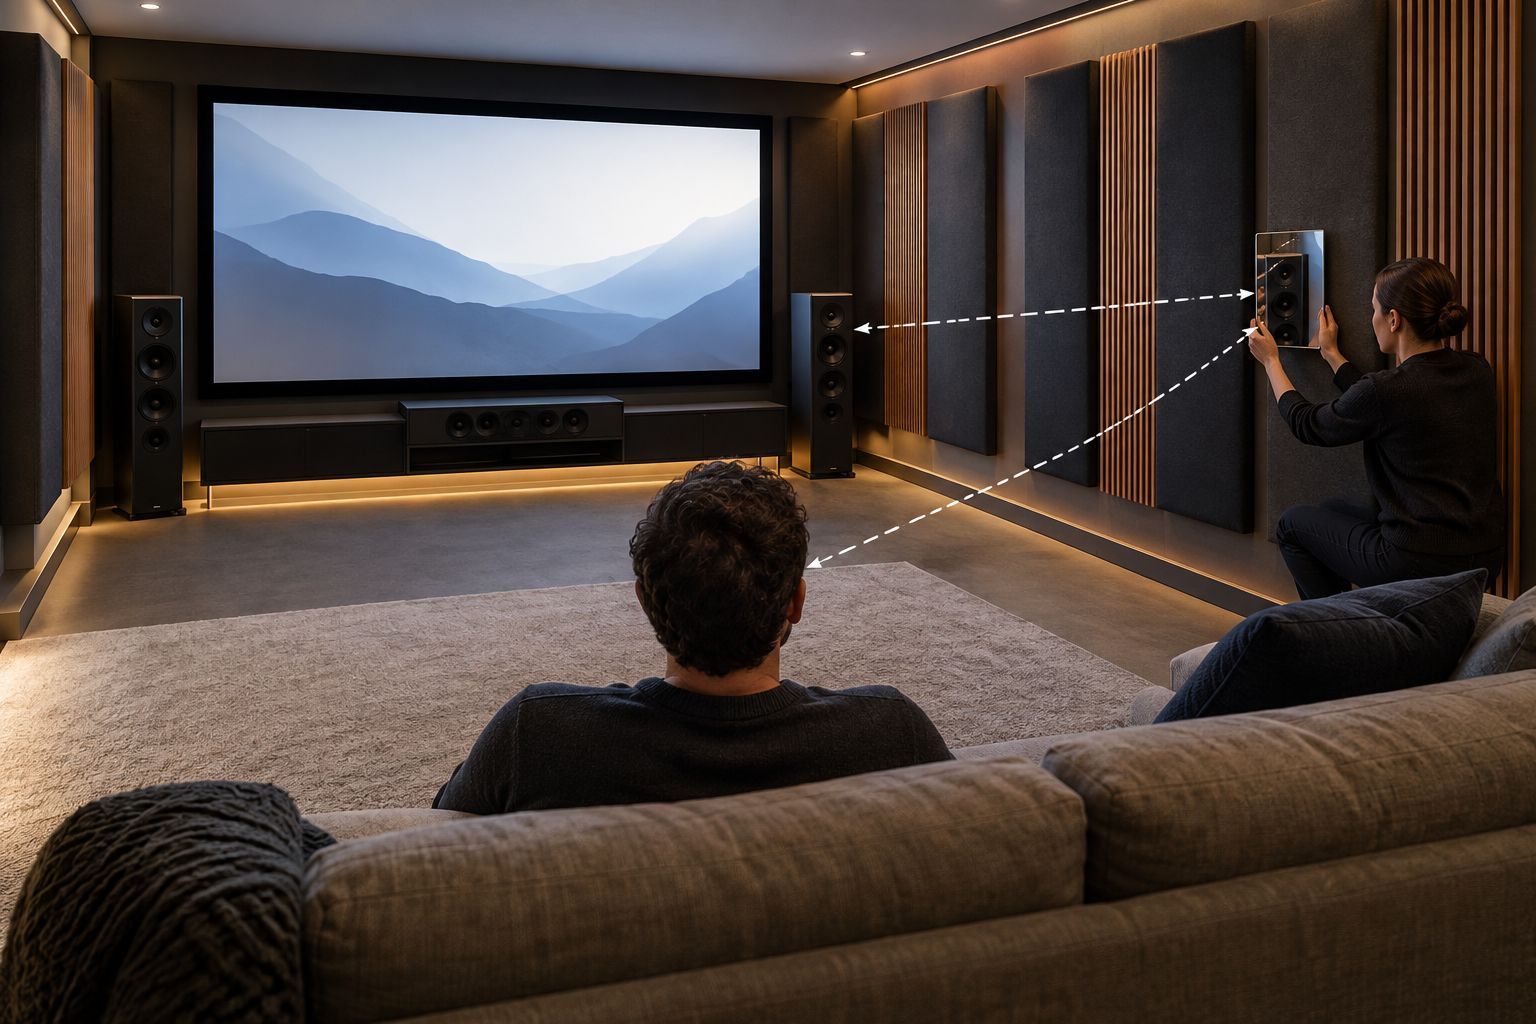
- Sit at the main listening position while a helper moves a mirror along a side wall. Mark where you can see each front speaker in the mirror.
- Repeat on the opposite wall. Mark these locations as candidate early-reflection areas, not guaranteed treatment boundaries.
- Check the same locations from other regularly used seats. A reflection area for one seat does not automatically cover the sofa.
- Inspect the rear wall, especially when seating is close to it. Consider ceiling and floor reflections separately rather than assuming wall panels address every surface.
- Compare the candidate areas with doors, sockets, speaker brackets and cable routes. Resolve conflicts before deciding panel quantities.
The mirror method identifies geometrical reflection paths. It does not tell you how much absorption a particular assembly provides, or whether the room needs additional bass control.
Expected result: Your treatment sketch connects panel placement to listening positions and reflection paths instead of placing everything behind the television for appearance alone.
Choose the assembly before the finish
Decide what each part of the installation must do. The following options solve different problems and can work together; none replaces all the others.
| Option | Best for | Advantage | Limitation |
|---|---|---|---|
| Acoustic wood panels | Homeowners combining wall finishes with room treatment | Integrate treatment into the interior design | Effectiveness depends on the complete assembly and frequency range |
| Dedicated broadband absorbers | Targeted reflection control | Can be selected using frequency-dependent absorption data | Require wall or ceiling space and affect the room's appearance |
| Bass treatment and placement changes | Persistent low-frequency problems | Address problems that thin wall treatments do not reliably resolve | Need measurements, space and room-specific decisions |
| AV room correction | Final speaker integration after physical changes | Adjusts supported level, timing and equalisation settings | Does not remove reflections or soundproof the room |
Akustiq UK's indoor slat panels have a three-sided real wood veneer finish and acoustic felt backing, with 240 cm and 300 cm formats. Choose the format around your measured wall height, joints and access requirements; panel length alone does not establish acoustic performance.
Before committing to your 2026 installation, check frequency-dependent absorption results for the mounting arrangement you intend to build. A single summary rating is not evidence that a panel will solve a low-frequency problem.
Install without changing the comparison accidentally
- Confirm the wall is suitable for the specified fixing method. Locate concealed cables and pipes, and use competent help for electrical alterations.
- Follow the installation instructions for the chosen assembly. Do not substitute cavity depths, backing materials or fixings and assume the same acoustic result.
- Keep speaker positions and sofa locations unchanged while assessing the treatment itself. Record any unavoidable movement.
- Preserve equipment ventilation and access to connections. Do not attach heavy AV equipment to decorative panels unless the mounting system explicitly supports it.
- Check edges, fixings and nearby objects for movement or contact that could cause vibration.
Expected result: The panels are secure, the specified assembly is intact and the room remains comparable with your baseline.
Post-installation calibration and verification
Measure the treated room first
- Return the microphone to the recorded baseline positions. Restore the same uncorrected measurement state and sweep settings.
- Repeat the relevant speaker and subwoofer measurements. Name the traces
2026 treated centre main seator use an equally clear convention. - Compare untreated and treated traces using the same graph scale and smoothing. Examine decay as well as response; do not declare success from a smoother-looking graph alone.
- Check the other listening seats. Identify whether the change benefits the seating area or mainly the central position.
If bass remains uneven, investigate seat and subwoofer placement before adding more wall coverage. Change one variable at a time, then measure again.
Expected result: You know what changed after installation before introducing a new calibration profile.
Run the receiver's calibration
- Connect the receiver's specified calibration microphone. Do not replace it with your REW microphone unless the receiver explicitly supports that substitution.
- Start the calibration procedure described in your receiver's manual. Use its prescribed microphone locations and sequence rather than importing another system's measurement pattern.
- Keep the microphone on a stand, clear of the seat back and away from hands or cushions. Leave the room quiet during test signals.
- Review the detected speaker assignments, warnings, trims and crossovers. Investigate unexpected results against the equipment manual instead of accepting every setting automatically.
- Save the new profile with a name identifying the treated room, where profile naming is supported. Record the date and the room layout.
Receiver menu labels differ by model, so use the exact controls documented for your equipment. Do not change a measured subwoofer distance merely because it differs from the tape-measure distance: the value can include delay through its electronics.
Expected result: Your final calibration describes the installed room rather than the untreated room.
Confirm the result with listening and measurements
Compare corrected and uncorrected playback at matched listening levels. Use familiar dialogue, a scene with moving effects and a bass-heavy passage; keep the source and listening position unchanged.
Listen for speech intelligibility, stable imaging and consistent bass across seats. Then check the corresponding measurements. A louder profile is not automatically a better profile, and one attractive graph does not establish that every seat improved.
Recalibrate whenever the room changes
The adjacent workflow is maintenance: repeat the relevant checks after moving the sofa, relocating a subwoofer, changing speakers or adding substantial treatment. Cosmetic changes do not all justify a complete measurement session; changes to acoustic surfaces or speaker geometry do.
Use this decision sequence:
- Record what changed and preserve the previous settings.
- Repeat the measurements affected by that change.
- Rerun receiver calibration when speaker positions, listening positions or the acoustic layout have changed.
- Compare playback and archive the replacement profile with its room notes.
Keep your 2026 records organised by room state, not just date. A profile labelled with the seating layout is easier to identify than several files named final.
Troubleshooting
Dialogue still sounds indistinct
Check centre-speaker placement, obstructions and reflections from nearby furniture before increasing its level. Then review treatment around relevant reflection paths; a panelled screen wall alone does not address the entire room.
Bass is still missing at the main seat
Compare bass measurements at nearby positions. A deep cancellation is a placement and integration problem, not a reason to apply a large equalisation boost; investigate seating, subwoofer location, crossover and timing.
Calibration reports a speaker error
Stop and inspect the channel assignment, connections and test-signal route. Confirm wiring against the manual before rerunning; do not reverse correctly connected wiring solely to clear a warning.
Panels or nearby objects rattle
Locate the vibrating part at a safe playback level, then check fixings, loose edges and objects touching the installation. Correct the mechanical fault before recalibrating; electronic correction does not secure a loose fitting.
Neighbours still hear the film
Separate room absorption from sound isolation. Investigate transmission through walls, doors, floors, ceilings and structural connections; acoustic wall panels are not a substitute for a sound-isolation design.
Customise your workflow
For a living room cinema, include the curtain position and normal furniture layout in your setup notes. For a dedicated room, extend measurements across the seats you actually use rather than optimising only an empty central chair.
Treat an Akustiq UK installation as part of the room specification, alongside speaker locations and cable access. If the design needs ceiling treatment or substantial low-frequency control, assess those requirements separately before completing the wall finish.
FAQ
Should I install acoustic wall panels before AV calibration?
Install acoustic wall panels before saving your final AV calibration profile. Record an untreated baseline first, measure again after installation, then run the receiver's calibration in the finished room.
Can room correction replace acoustic wall panels in a home cinema?
Room correction cannot replace physical acoustic treatment. It adjusts speaker output, while treatment changes how sound interacts with room surfaces; use each for its specific role.
Where should acoustic panels go in a home cinema?
Choose panel positions from reflection paths, listening positions and room measurements. Side-wall reflection areas and the rear wall deserve assessment, but the appropriate coverage depends on the room and the selected assembly.
Will wooden acoustic panels fix weak subwoofer bass?
Do not rely on wooden acoustic wall panels to fix weak subwoofer bass. Investigate seating, subwoofer position and integration first, then select any bass treatment using relevant performance data.
Can I use the same microphone for REW and receiver calibration?
Use the microphone specified for each system unless compatibility is explicitly documented. REW measurements and a receiver's automatic calibration can require different microphones and signal connections.
Do acoustic wall panels stop home cinema noise reaching neighbours?
Acoustic wall panels do not replace soundproofing. Reducing noise transmission requires assessment of the building's separating surfaces, gaps and structural paths.
When should I rerun home cinema calibration?
Rerun calibration after changes to speaker positions, listening positions or the acoustic treatment layout. Preserve the previous profile and repeat relevant measurements so you can judge the change.
One last thing
A subwoofer's calibration distance is not always its physical distance. Electronic delay can contribute to the receiver's result, so replacing it with a tape-measure value can disturb integration.
Keep the measured setting unless verification gives you a reason to change it. The same discipline applies throughout this workflow: measure the room you have, change one thing, then check the result.
Share:
How to connect acoustic wall panel LED lighting to a smart home system
How to coordinate acoustic wall panels with an office HVAC noise plan