Fixing exterior cladding to a steel frame building means creating a timber batten counter-frame first, then screwing wood-effect panels to that frame rather than straight into the steel — skip the batten step and panels will bow, trap moisture, and fail within a year.
TL;DR
Exterior cladding on a steel frame building needs a ventilated batten system fixed to the steel purlins or uprights before any panel goes on — direct fixing into steel with standard screws is the most common failure mode reported by installers in 2026. Akuwood Panel's exterior wall cladding panels (birch, oak, black and stone grey finishes) are designed to sit on a 25-30mm batten void, fixed with dedicated exterior wall cladding screws, and finished with matching corner trim. Verdict: battened installation over direct-fix, every time — the 20-30 minutes extra per elevation buys you a cladding job that survives a UK winter instead of one that doesn't.
Why this matters
Steel frame buildings move. Thermal expansion and contraction in the frame is greater than in timber frame construction, and if cladding is fixed rigidly to steel with no allowance for that movement, panels crack at the fixing points within 12-18 months.
Steel also conducts moisture differently to timber or masonry. Condensation forms on the inside face of steel cladding rails, and without a ventilated void behind the cladding, that moisture has nowhere to go — it sits against the back of your panels and rots the substrate from behind, invisibly, until the finish starts bubbling on the front face.
Get the batten and ventilation detail right in 2026 and the panel choice becomes the easy part. Get it wrong and no panel, however good, survives the job.
What you'll need
- Treated timber battens, minimum 38mm x 25mm, for the counter-frame
- Self-drilling steel fixings or Tek screws rated for the steel gauge of your frame
- A spirit level and chalk line for marking batten runs
- Exterior wall cladding panels in your chosen finish
- Dedicated exterior wall cladding screws matched to the panel finish
- A breathable membrane if the steel frame has an insulated infill panel behind the cladding line
- A cordless drill/driver, a jigsaw or fine-tooth saw for cutting panels, and a tape measure
- Corner and finishing trim pieces for edges, window reveals and building corners
The steps
1. Survey the steel frame and mark your batten grid
Walk the elevation and identify every purlin, rail or upright the battens will land on — you need a fixing point every 400-600mm vertically depending on panel weight and wind exposure. Missing this step means battens flex under wind load later and the whole cladding line ripples.
Mark horizontal or vertical lines with a chalk line, checking level and plumb every 3-4 metres. Steel frames are usually straighter than timber frames, but weld tolerances still creep by a few millimetres over a long run, and that's enough to throw off a cladding pattern by 2026 standards of finish expected on visible facades.
Common mistake: marking off the ground line instead of off the steel frame itself — ground levels vary but the frame doesn't, so always reference your battens to the structure.
2. Fix the batten counter-frame to the steel
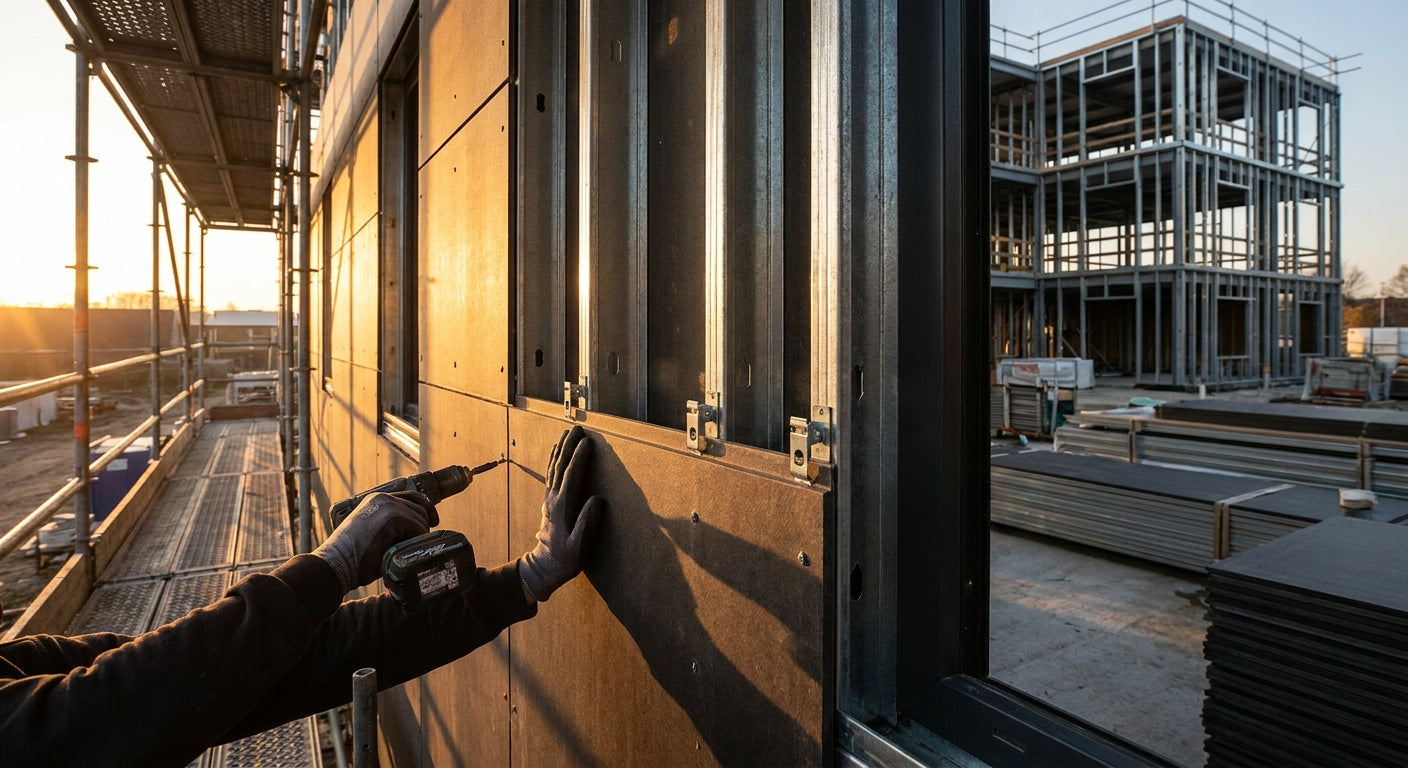
Use self-drilling steel screws to fix each batten directly into the steel purlin or rail at every marked point. For box-section steel, pre-drill a pilot hole first; self-drilling screws bite better on thinner rail steel than on thicker box sections.
Space fixings every 400-500mm along each batten run, and always fix within 50mm of a batten's cut end to stop it lifting. This is the load-bearing step of the whole job — the panels only carry cosmetic weight from here, so a loose batten means a loose cladding line.
Common mistake: using standard woodscrews instead of self-drilling steel-rated fixings — they strip the thread inside the steel within weeks and the batten works itself loose in the first storm.
3. Fit a breather membrane where required
If there's an insulated infill or built-up wall behind the batten line, staple a breathable membrane over the insulation before the panels go on. This lets vapour escape outward while blocking wind-driven rain from getting behind the cladding.
Overlap each membrane roll by at least 100mm and tape the joints. Skip this on a bare steel frame with no infill — you don't need a membrane if there's nothing behind the battens for moisture to sit against.
4. Cut panels to length and dry-lay the first run
Measure the elevation height and cut your first panel run with a fine-tooth saw or jigsaw, checking the cut edge is square before you commit. Dry-lay two or three panels against the battens to confirm the reveal, gap, and starting line before driving a single screw.
This is where most jobs go wrong on steel frame buildings specifically — corners and window openings on industrial steel builds are rarely perfectly square, so a dry-lay catches a 5mm taper before it becomes a 40mm gap by the far end of the wall.
Expected outcome: a level, gapped starting course that reads true across the whole elevation, not just the first metre.
5. Fix the panels to the battens
Work left to right (or bottom to top for horizontal runs), fixing each panel to the timber battens with exterior wall cladding screws at every batten crossing point. Keep a consistent gap between panels — most installers run 5-8mm to allow for seasonal movement in the timber-effect finish.
Don't overtighten. Snug the screw so the panel sits flat against the batten without crushing the surface — overdriven screws dimple the finish and become a visible defect the moment low winter sun hits the facade.
Common mistake: fixing panels tight together with zero gap — that's the single biggest cause of buckling call-outs in the first summer after installation.
6. Finish corners, edges and openings
Run corner trim down every external and internal corner before the final panel run goes in — trims are far easier to fit while there's still access, not after the last panel is screwed home. Use finishing trim around door and window reveals to close the cut edges cleanly.
A building corner without trim is the first place water gets behind the cladding, so don't treat this as optional finishing — treat it as the final structural detail of the job.
7. Check the base detail and gutter clearance
Confirm the bottom edge of the cladding sits at least 150mm above finished ground level or hardstanding, and that there's a clear drip line so rainwater doesn't wick back up into the batten void. On steel frame agricultural or commercial buildings, gutters and rainwater goods often sit close to the wall line — check clearance before the last panel run goes on, not after.
Expected outcome: a bottom edge that sheds water cleanly away from the wall, with no ponding against the panel face.
Troubleshooting
- Panels bow outward after a few months — the batten spacing is too wide for the panel weight; add an intermediate batten and re-fix.
- Screw heads show through the finish — you're overtightening; back off the driver's clutch setting by one or two notches.
- Gaps widen unevenly along a run — the starting course wasn't checked level in step 4; unpicking and re-setting the first two panels usually fixes the whole run.
- Rust staining appears at fixing points — self-drilling screws into steel weren't rated for exterior exposure; replace with a corrosion-resistant grade.
- Damp patch appears low on the wall — check the drip line and ground clearance from step 7; standing water at the base is the most common cause.
- Panel finish looks patchy in direct sun — inconsistent fixing pressure across the run; a slight variance in how tight each screw was driven shows up as sheen differences outdoors.
Tools and resources
- Cordless drill/driver with adjustable clutch
- Self-drilling steel screws for the batten fix, exterior wall cladding screws for the panel fix
- Spirit level, chalk line, tape measure
- Jigsaw or fine-tooth handsaw for panel cuts
- Corner trim and finishing trim for edges and reveals
- A second pair of hands for holding panel runs level while fixing — a one-person install on a full elevation slows the job down and increases the risk of an uneven start course
For fixings suited to different substrates beyond steel — brick, render, timber frame — the cladding fixings guide breaks down which screw type matches which wall.
What to do next
Once the batten frame and panel fix are done, the next job is usually maintenance planning — knowing how often to check fixings and clean the finish keeps a steel-frame cladding job looking right for years rather than months. If your build is timber frame rather than steel, the fixing approach differs enough that it's worth reading the dedicated timber frame cladding guide before you start.
FAQ
Can you fix cladding directly to a steel frame without battens? No — direct fixing traps moisture against the panel back and doesn't allow for thermal movement in the steel, which is why a batten counter-frame is standard practice on steel builds in 2026.
What screws do you use for cladding on steel? Self-drilling steel-rated screws fix the timber battens to the steel frame, while separate exterior wall cladding screws fix the panels to the battens — the two jobs need different fixing types.
How much of a gap do you need between steel frame and cladding? A ventilated void of 25-30mm behind the panel line, created by the batten depth, lets moisture escape and stops condensation sitting against the cladding.
Is exterior cladding on steel frame buildings suitable for agricultural sheds? Yes, provided the batten spacing accounts for wind exposure on an open site — agricultural steel buildings often need tighter batten centres than a sheltered domestic elevation.
How long does exterior cladding last on a steel frame building? Longevity depends on fixing quality more than the cladding material itself — a correctly battened and ventilated install with corrosion-resistant screws is what determines whether a job lasts a decade or fails in three years.
Do you need a breather membrane behind cladding on a bare steel frame? Only if there's insulation or infill behind the batten line — a bare steel frame with nothing behind the void doesn't need a membrane.
What's the biggest mistake people make fixing cladding to steel? Skipping the batten counter-frame and screwing panels straight into the steel — it's the single fastest route to bowed panels and trapped moisture.
Can you use the same cladding panels on steel frame and timber frame buildings? Yes, the panel itself doesn't change, but the fixing method into the substrate does — steel needs self-drilling fixings for the batten stage where timber frame takes standard wood screws directly.
One last thing
Most failed cladding jobs on steel frame buildings aren't a panel problem — they're a 30-minute-saved-on-battens problem. Spend the extra half hour getting the counter-frame level and ventilated in 2026, and the panel finish on top of it becomes almost irrelevant to how long the job lasts.