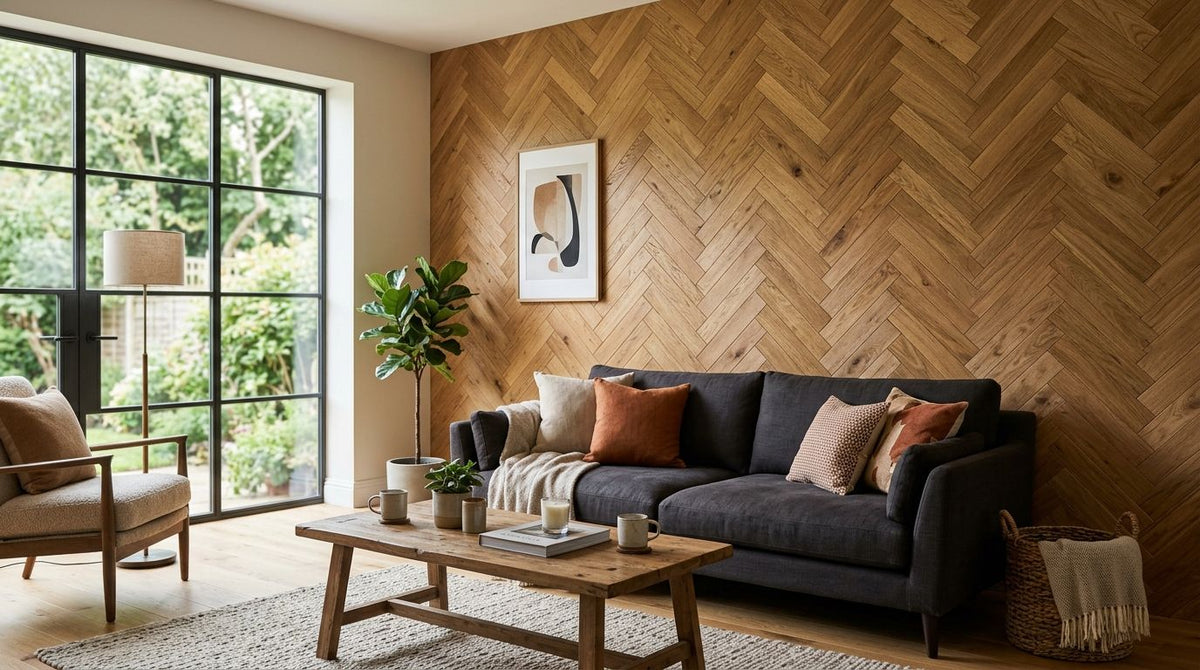
Living room herringbone wood wall panels are wood veneer slats cut and angled into a chevron pattern on a feature wall, built to add texture and cut echo in the room where a household spends the most waking hours. Unlike a hallway or bedroom application, a living room wall carries the weight of TV viewing, music, and everyday conversation, so panel choice has to balance pattern impact against real acoustic performance.
- Herringbone wood wall panels are DIY-cut from standard oak veneer slats at 45 degrees, not a pre-cut retail product in the UK in 2026.
- Akustiq UK's rustic oak 3-sided veneer panel and natural oak panel both carry acoustic felt backing suited to a herringbone cut.
- Dry-fit every strip before gluing; a drift of half a degree per strip compounds fast across a 3-metre living room wall.
- Hexagon and fish-scale 3D panels are the faster alternative when cutting angles at home isn't practical.
Why herringbone wood wall panels matter for a living room
A living room absorbs more foot traffic, noise, and scrutiny than almost any other panelled room in a UK home in 2026 — it's where guests sit, where the TV runs for hours most evenings, and where a bare plasterboard wall behind the sofa gets stared at every night. A flat feature wall in this room has to do two jobs at once: look deliberate, and tame the echo that comes off hard floors and a large TV screen.
Herringbone patterning solves the visual half of that by breaking a wall up with rhythm instead of one repeated slat direction, which reads as more considered than a straight-slat wall in the same finish. Panels like the rustic oak 3-sided veneer panel carry acoustic felt backing that handles the sound half of the job, so the chevron cut doesn't cost you the panel's original purpose. Akustiq UK's acoustic wood wall panels are built with this backing as standard, which matters more in an open-plan living room where there's little soft furnishing left to absorb reflected sound.
Open-plan UK living rooms increasingly pair hard flooring with minimal soft furnishing, which leaves fewer surfaces to catch reflected sound. A herringbone wall built from Akustiq UK's acoustic wood wall panels puts absorption back into the room without forcing you to add curtains or a rug you don't otherwise want, which is exactly the trade-off a living room feature wall needs to make.
How to plan a herringbone feature wall for your living room
Herringbone panelling rewards planning more than any other wall pattern going into 2026 — get the angle or the starting point wrong and the chevron reads as messy rather than deliberate. Work through these steps before a single panel goes up.
Measure your living room wall before you buy anything
Get the dimensions and the obstacles mapped out first; herringbone patterns are far less forgiving of guesswork than a straight slat wall.
- Measure floor-to-ceiling height and wall width in at least three places — older walls are rarely square.
- Mark the position of sockets, radiators, and light switches you'll need to cut around.
- Decide whether the herringbone runs floor-to-ceiling or as a waist-height feature strip behind the sofa.
- Check the wall with a spirit level and note any bow greater than a few millimetres.
- Photograph the wall with a tape measure in shot so you have a reference when you're back at the cutting table.
- Note the direction of natural light across the wall — it changes how deep the chevron shadow lines read at different times of day.
Choose a wood finish with a grain that reads at an angle
Not every finish holds a clean chevron line — busy or knotty grain fights the pattern instead of following it.
- Pick a finish with a visible, fairly straight grain; natural oak, rustic oak, and smoked oak hold a clean 45-degree edge better than low-contrast finishes.
- Order a sample panel and hold it at an angle in the room's actual light before committing to a full wall.
- Match the undertone — warm oak versus grey oak versus black oak — to the existing floor so the herringbone doesn't clash with the boards underneath it.
- Avoid mixing two finishes on the same herringbone wall; subtle undertone differences on a sample board become obvious across fifty strips.
- Consider a darker finish such as walnut or mocca if the wall sits opposite a large window — deeper tones hide small cutting inconsistencies better than pale finishes.
Cut your panels for the herringbone angle
This is the step that decides whether the finished wall looks intentional or slightly off.
- Set a mitre guide or track saw to exactly 45 degrees and test-cut scrap material first.
- Cut every strip to the same width; a 1-2mm variance across dozens of strips becomes visible drift by the third row.
- Label the angled ends as you cut so you don't mix left-facing and right-facing offcuts.
- Follow a full method for cutting acoustic wood panels to size rather than eyeballing each strip.
- Keep offcuts — herringbone patterns use short lengths at the wall edges, and offcuts fit those gaps better than fresh full panels.
- Work in batches of ten strips at a time and re-check your saw angle between batches; blades drift slightly with repeated use.
Dry-fit the full pattern before you fix anything
Never glue the first strip until you've seen the whole pattern laid out.
- Lay the cut strips on the floor first, in the exact pattern you'll fix to the wall.
- Check that the point of each chevron lines up edge to edge across the full width.
- Step back at least 2 metres and view the dry-fit from the main seating position, not standing at the wall.
- Adjust the starting point now — moving one strip on the floor costs nothing, moving a glued strip means a repaint.
- Count your total strips against the dry-fit layout so you know before gluing whether you're short.
Fix and glue the panels in sequence
Work outward from a fixed point so the pattern stays centred once furniture goes back against the wall.
- Start from the centre of the wall or from a fixed focal point, such as a chimney breast or TV recess, and work outward in matching pairs.
- Use a construction adhesive rated for interior timber veneer, such as high-tack panel glue, applied in a zigzag bead rather than full coverage.
- Press and hold each strip for the manufacturer's stated cure time before moving to the next row.
- Wipe excess glue immediately — cured adhesive on a veneer face doesn't sand out cleanly.
- Work in short sessions rather than gluing the whole wall in one sitting; fatigue is where alignment mistakes creep in.
Finish the edges and corners
A herringbone wall reads as built-in or as a DIY project almost entirely based on how the edges are handled.
- Use matching end pieces or trims at any exposed panel edge rather than leaving a raw cut face.
- Caulk the join between the panelled section and the ceiling or skirting for a built-in look.
- Fill any small gaps at the wall's outer edges with colour-matched wood filler before the final coat.
Style the room around the finished wall
A strong pattern changes what the rest of the room needs to do.
- Keep nearby furniture low-profile so the chevron pattern stays the visual focus rather than competing with tall shelving.
- Light the wall with a warm-temperature wash rather than a single downlight, which flattens the angle instead of highlighting it.
- Leave breathing room either side of the panelled section — herringbone reads stronger with a plain border than edge-to-edge coverage.
“A drift of half a degree per strip is invisible on the first row and impossible to hide by the fourth.”
Choosing a finish that suits your living room's light
A living room's orientation decides more of the finish choice than personal taste does. North-facing rooms with cooler, flatter light tend to suit warmer tones — natural oak or rustic oak keeps the chevron from looking grey and lifeless. South-facing rooms with strong direct sun can carry darker finishes like black oak, smoked oak, or walnut without the wall reading as heavy, since sunlight brings out the grain contrast at the angled joins.
Grey oak and mocca sit in between and work well where the rest of the room is already neutral and you want the herringbone pattern itself, not the colour, to carry the visual interest. Whichever finish you pick, order it in the same batch for the whole wall — oak veneer varies slightly between production runs, and a herringbone pattern makes any batch mismatch far more visible than it would be on a straight slat wall.
Herringbone options compared for a living room feature wall
Herringbone isn't the only pattern option for a living room feature wall, and it isn't always the right call for every budget or skill level. Here's how the realistic choices stack up against each other.
| Option | Best for | Key limitation |
|---|---|---|
| Cut wood veneer slat panels into a herringbone layout | Owners who want true angled wood grain with acoustic felt backing | Needs precise 45-degree cuts and generates more offcuts than a straight wall |
| Herringbone-print peel-and-stick wallpaper | Renters or a fast cosmetic update with no cutting tools | Printed finish only, no acoustic benefit, reads as wallpaper up close |
| 3D geometric decorative wall panels (hexagon, fish-scale) | Buyers who want pattern and texture without cutting an angle themselves | Different geometry entirely — hexagon and fish-scale aren't a herringbone chevron |
| Bespoke solid wood herringbone joinery | Period living rooms going for a traditional parquet-style wall | Needs a carpenter and a longer lead time than panel installation |
Verdict: cutting Akustiq UK's acoustic wood wall panels into a herringbone layout is the only option here that keeps both the acoustic backing and the real wood grain — pick it if you want the pattern to do double duty in 2026.
Common herringbone mistakes living room owners make
Most herringbone feature walls in 2026 fail on layout and planning, not on the cut itself.
- Starting the pattern from a corner instead of the room's focal point. The chevron point ends up off-centre once the sofa and TV unit go back against the wall.
- Mixing two different wood finishes on the same herringbone wall. Undertone differences that look subtle on a sample board become obvious once fifty strips sit side by side.
- Skipping the dry-fit stage to save time. A drift of even half a degree per strip compounds visibly by the third or fourth row on a typical living room wall.
- Treating the herringbone wall as the only design decision in the room. A strong pattern needs balance elsewhere — layering in cosy throw blankets for sofas and a plain-weave rug pulls texture back toward the seating area instead of leaving all the visual weight on one wall.
- Under-ordering material. Herringbone cuts waste more timber than a straight slat wall, and running short mid-installation risks a colour-batch mismatch on the last few strips.
- Gluing before checking the dry-fit against the actual seating position. A pattern that looks centred from the wall itself can read off-centre once you sit down on the sofa across the room.
FAQ
What is a herringbone wood wall panel?
It's a wood veneer slat cut and installed at a 45-degree angle so pairs of strips form a V-shaped chevron pattern across a wall. It's a DIY layout technique using standard panels rather than a separate pre-cut product.
Is herringbone wood panelling hard to install yourself?
It takes more precision than a straight slat wall because every strip needs an accurate 45-degree cut, but it doesn't require specialist tools beyond a mitre guide or track saw. Dry-fitting the whole pattern before gluing removes most of the risk.
Do herringbone wall panels help with room acoustics?
Yes, if the panels carry an acoustic felt backing, which Akustiq UK's oak veneer panels do as standard. The felt absorbs sound the same way whether the strip is fitted straight or at an angle.
Which wood finish looks best in a herringbone pattern?
Finishes with a visible, fairly straight grain such as natural oak, rustic oak, or smoked oak hold a clean angled line better than busy or knotty grain. Order a sample and view it at an angle in the room's own light before buying a full wall's worth.
How much extra wood do I need for a herringbone cut versus a straight wall?
Expect more waste than a straight slat wall because every strip needs a mitred end cut and short offcuts appear at the wall's edges. Order extra material rather than risk a batch mismatch if you run short mid-installation.
Can I use 3D decorative wall panels instead of true herringbone?
Yes, but the pattern will be different — hexagon or fish-scale 3D panels give texture and repetition without the angled chevron look of true herringbone. Pick 3D panels if you want pattern without cutting anything yourself.
Does herringbone wall panelling work in a small living room?
Yes, though a full floor-to-ceiling herringbone wall in a small room can visually shrink it; a waist-height feature strip behind the sofa keeps the pattern without overwhelming the space.
How do I keep the herringbone pattern lined up across a long wall?
Cut every strip to an identical width, dry-fit the full pattern on the floor before fixing anything, and start from a fixed centre point rather than a corner. A drift of even half a degree per strip becomes visible by the third or fourth row.
One last thing
Most herringbone feature walls in 2026 fail on layout, not craftsmanship — installers get the cutting angle and the finish right, then start the first row flush against a corner instead of centring it on the room's real focal point. Dry-fit the whole pattern on the floor, stand at the doorway, and check where your eye actually lands before a single strip touches adhesive.