

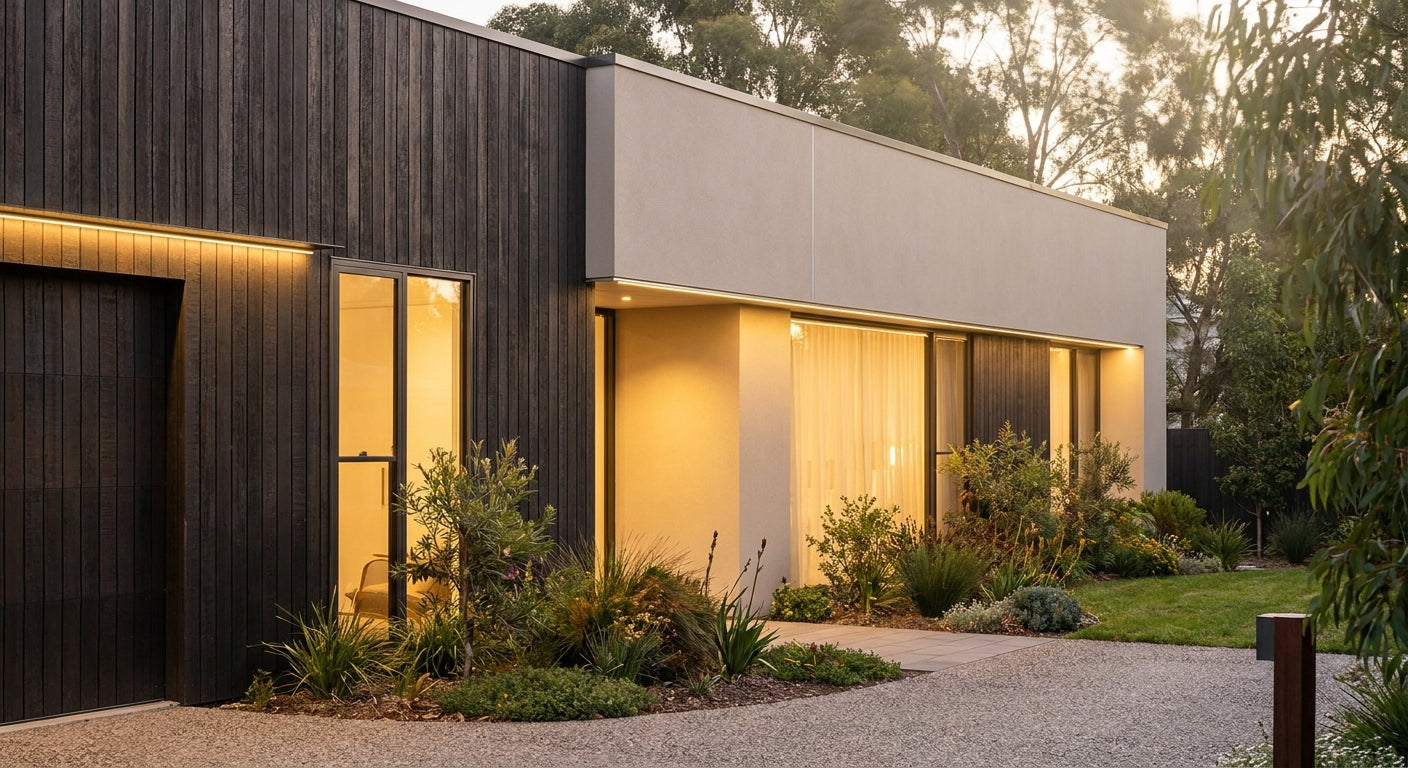
Splitting one facade between exterior cladding and render is one of the easiest ways to break up a flat elevation without a full rebuild, and it's become one of the most requested finishes on UK self-builds and renovations in 2026. Get the junction detail wrong, though, and you end up with a damp line, a crooked edge, or a cladding strip that looks bolted on rather than designed in.
- Combine exterior cladding with render facade by battening out the cladding zone so both surfaces sit flush at the transition line.
- Stone Grey cladding panels pair with white or grey render for the cleanest 2026 contrast split — Buy for new-build fronts.
- A finishing trim at every cladding-to-render edge stops water tracking behind the boards — skip it and you'll be chasing damp within a year.
- Plan the split line at a window head, corner, or storey change, never mid-wall, or the design reads as an afterthought.
Why this matters
A cladding-and-render split isn't just a look. Render is a solid, breathable finish fixed direct to the wall; cladding needs a ventilated cavity behind it to shed moisture and let timber-effect boards move with temperature. Mixing the two on one elevation means mixing two different build-ups, and the join between them is where 90% of failures show up — water tracking down behind an unsealed edge, or a cladding panel sitting proud of the render by 15-20mm because nobody accounted for batten depth.
Done properly, the split becomes the feature: a Stone Grey or Black cladding panel wrapping a bay window while white render carries the rest of the facade, or a full ground-floor cladding band under a rendered upper storey. Done badly, it's the first thing a surveyor flags on a 2026 resale.
What you'll need
- Exterior-grade composite cladding panels rated for outdoor use — Exterior Wall Cladding Panel Stone Grey is a common choice against white or grey render
- Treated timber battens (25mm minimum) to build the ventilated cavity
- A finishing trim and corner trim matched to the cladding colour
- Breathable membrane for behind the batten zone
- Stainless or coated exterior screws
- Spirit level, chalk line, jigsaw or circular saw with a fine-tooth blade
- Silicone sealant rated for exterior masonry joints
- A tape measure and a plan drawn to scale before you touch the wall
The steps
1. Mark the split line before you order anything
Decide where cladding ends and render begins, and do it at a natural break — a window reveal, a corner, a change in wall plane, or a storey line. A split running mid-elevation with no architectural reason looks unplanned from the street, and it's the single most common mistake on 2026 renovation jobs. Chalk-line the boundary on the existing render and step back 10 metres to check it reads correctly before ordering panels.
2. Choose cladding that reads as intentional against the render colour
Dark cladding against light render (Black or Smoked Oak tones against white) gives the sharpest contrast and is the most forgiving of small fitting errors because the eye reads the line, not the millimetres. Light-on-light — natural oak against a cream render — needs tighter tolerances because any gap shows. Match undertones: a warm render calls for oak or birch tones, a cool grey render suits Stone Grey cladding.
3. Batten out the cladding zone to match render depth
This is where most DIY splits go wrong. Render typically sits 12-20mm proud of the brick or block substrate once you count base coat and top coat. Your batten-plus-cladding build-up needs to land flush with that render face, not just flush with the bare wall, or you'll get a step at the junction that traps water. Measure the actual render thickness at three points along the split line before cutting battens — it's rarely uniform on an older facade.
4. Fit a breathable membrane and vertical battens
Fix treated battens vertically at 400-600mm centres over the membrane, plumbed with a spirit level, not just eyeballed against the existing wall line — old render is rarely dead straight. This cavity is what lets water drain and air circulate behind the cladding; skip it and moisture gets trapped against the timber, which is the fastest way to void a cladding warranty.
5. Install a finishing trim at every cladding-to-render junction
The trim is not cosmetic — it's the waterproofing detail. A finishing trim overlaps the render edge by 10-15mm and channels rainwater away from the joint instead of letting it wick sideways into the render substrate. Run a bead of exterior silicone behind the trim before screwing it down, and check it with a hose before you consider the job finished.
6. Fix the cladding panels working outward from the trim
Start at the trim and work away from the render line so any small cutting inaccuracy ends up at the far edge or a corner, not against the visible junction. Fix through the tongue at each batten point, keeping a consistent 2-3mm expansion gap between boards for thermal movement across a 2026 UK temperature range of roughly minus 5°C to plus 30°C.
7. Seal the base and check for square
The bottom edge of the cladding needs a drip detail or gap off any hard landscaping — cladding sitting in standing water or snow melt for weeks at a time will fail early regardless of the timber-effect coating. Step back and check the whole split line for square and level before you clean up; a 5mm lean over 2 metres is visible from the pavement.


Troubleshooting
- Gap opens up at the render junction after a few months — the batten wasn't set to match render depth; pack it out with an extra 5-10mm shim rather than re-battening the whole run.
- Water stain appears below the trim line — the trim was fitted without a silicone bead behind it; strip, re-seal, and check the membrane hasn't torn.
- Cladding panel bows outward at the centre — battens are spaced wider than 600mm; add an intermediate batten and re-fix.
- Colour looks wrong once both surfaces are dry — render dries 2-3 shades lighter than wet application; always compare cladding samples against fully cured render, not fresh render.
- Corner detail looks unfinished — a plain butt joint at an external corner reads as a mistake; a dedicated corner trim solves this in one fix.
- Cladding sits proud of the render face — the most common error, caused by skipping step 3; there's no fix except re-battening to the correct depth.
Tools and resources
- Spirit level (1.2m minimum) and chalk line for the split-line layout
- Jigsaw with a fine-tooth blade for panel cuts around openings
- Cordless drill/driver and stainless exterior screws
- Silicone gun rated for exterior masonry joints
- A worked example of the full technique is covered in how to install exterior cladding on a rendered wall, which walks through fixings for solid and cavity substrates
What to do next
Order a sample of your chosen cladding tone before committing to a full run — colour under UK daylight in 2026 can read noticeably cooler or warmer than it does on screen. If you're still deciding between finishes, work out the split line and material pairing first; the fixing method is the same regardless of which cladding colour you land on.
FAQ
Can you fit exterior cladding directly onto render?
No — cladding needs a ventilated batten cavity behind it, even when it's butting up against render. Fixing panels flat to a rendered wall traps moisture and voids most cladding warranties.
What's the best cladding colour to combine with white render?
Black or Stone Grey cladding gives the sharpest, most forgiving contrast against white render in 2026. Light oak tones against light render need tighter fitting tolerances because gaps show more.
Where should the cladding-to-render split line go on a facade?
Put it at a window reveal, a corner, or a storey change, never mid-wall. A split with no architectural logic reads as unplanned from street level.
How much does it cost to combine cladding with render on a UK facade?
Costs scale with elevation size and cladding coverage, so get panel counts confirmed against your actual measurements before ordering. Composite cladding boards and finishing trims are priced per length on the AKU Woodpanel site.
Do you need planning permission to add cladding to a rendered house?
Most partial cladding on an existing render doesn't need permission under permitted development, but listed buildings and conservation areas often do. Check with your local planning authority before ordering materials.
How long does exterior cladding last against render?
Quality composite cladding panels are rated for around 25 years of maintenance-free use when the batten cavity and trims are fitted correctly. Render typically needs recoating every 15-20 years, so plan the junction to allow future render maintenance without disturbing the cladding.
What trim do you need where cladding meets render?
A finishing trim matched to the cladding colour overlaps the render edge and channels water away from the joint. Skipping this trim is the leading cause of damp staining at cladding-to-render junctions.
Can you clad over an existing rendered wall without removing the render?
Yes, as long as the render is sound and not cracked or hollow-sounding when tapped. Batten straight over solid render; hollow or crumbling render needs repair first or the batten fixings won't hold.
One last thing
The detail that separates a clean split from an amateur one isn't the cladding colour — it's whether the render thickness got measured before the battens were cut. Every troubleshooting case above traces back to that one step, and it takes five minutes with a tape measure to get right.
Share:
Exterior Cladding for Boundary Wall Privacy: 2026 Verdict
Wood Panels on a Sloped Attic Wall: 2026 Fitting Guide