

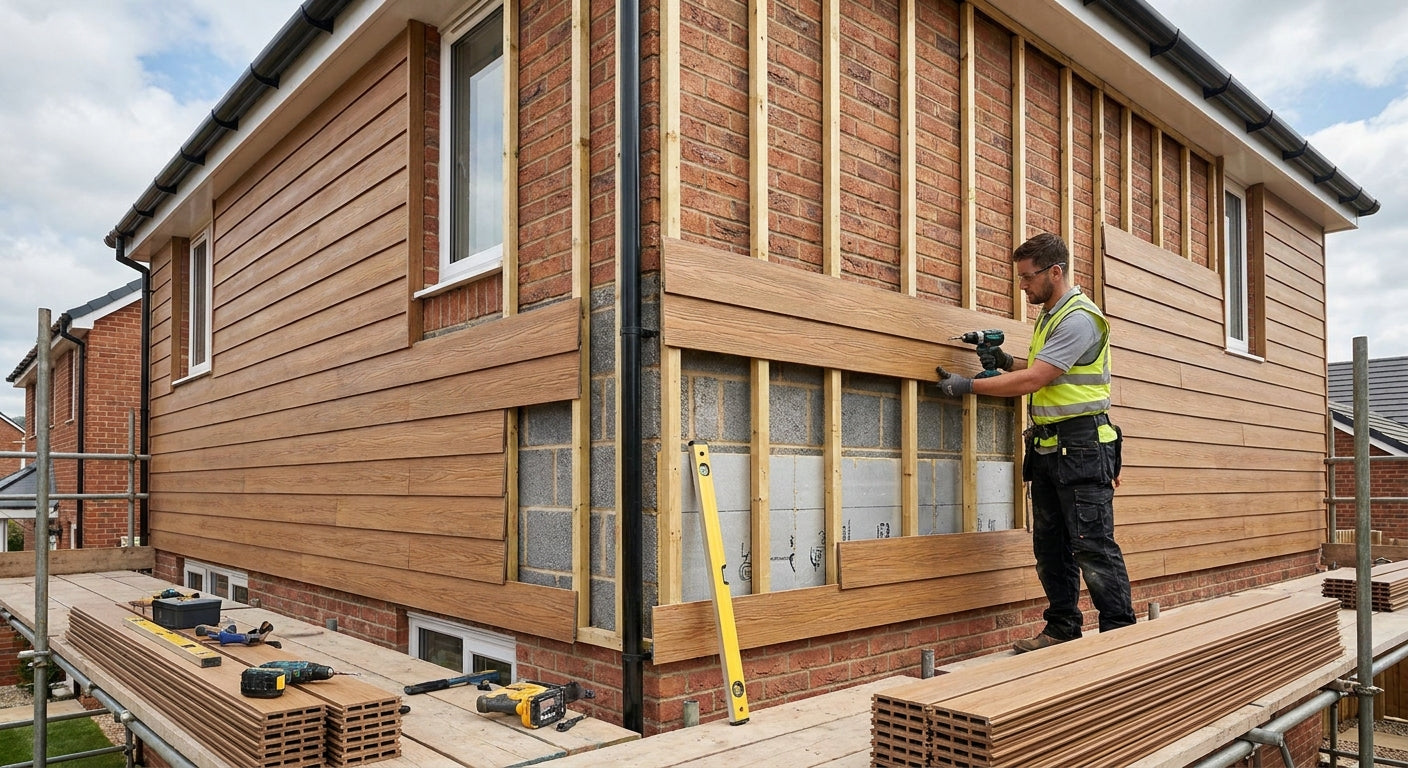
Fitting exterior cladding on a cavity wall means building a batten frame that clears the damp-proof course, keeps a ventilated air gap behind the boards, and never bridges the cavity with a solid fixing. Get those three things right and the cladding will outlast the render underneath it.
TL;DR
Cladding a cavity wall in 2026 comes down to five things: a vertical batten frame fixed only into brick or block (never plugged wall ties), a breather membrane behind the battens, a minimum 25mm ventilated cavity behind the boards, stainless or A4 fixings, and a drip detail at the base. Verdict: doable as a weekend DIY project if your wall is reasonably flat and you're working under 3 metres high — anything taller, or any wall with visible damp or cracked render, needs a surveyor first. Akustiq UK's exterior wall cladding panels are designed to sit on a standard 400mm batten grid, which is the spacing most UK installers use for this job.
Why this matters
A cavity wall already has a job to do: keep the outer leaf, the cavity, and the inner leaf separate so damp can't cross. Cladding sits in front of that system, not inside it. If you fix battens through mortar joints into the wrong leaf, or you seal the cladding tight against the wall with no airflow, moisture gets trapped and the timber behind the render starts to fail within a couple of years.
UK Building Regulations Part L and Part C both apply here — cladding over 18 metres has extra fire rules, but for a standard two-storey semi or bungalow the main concerns are ventilation, fixing depth, and keeping the cavity's weep holes clear. None of that is complicated once you know the sequence.
What you'll need
- Vertical treated softwood battens, 38mm x 25mm minimum, cut to wall height
- Breather membrane (100g/m2 or heavier for coastal or exposed sites)
- Stainless steel or A4 fixings rated for masonry, minimum 75mm into brick or block
- A masonry drill with an SDS setting and 6-8mm bits
- Spirit level (1.2m minimum) and a chalk line
- Exterior cladding panels — exterior wall cladding panel oak if you're matching a natural timber render tone
- Matching screws — exterior wall cladding screws in oak finish to avoid dark fixing heads showing through
- Finishing trim for edges and corners — exterior wall cladding finishing trim oak
- Packers (treated ply offcuts work) for levelling out-of-plane brickwork
- A helper for anything above head height — this is a two-person job past 2.4 metres
Budget half a day per wall elevation once battens are up, longer if the render underneath is uneven and needs packing out.
The steps
1. Survey the wall and mark the DPC line
Find the damp-proof course, usually 150mm above external ground level, and mark it with chalk along the whole elevation. Cladding must finish at least 150mm above this line and never bridge it — this single measurement causes more failed installs than anything else. Expect a slightly uneven line on older properties; work to the highest point of the DPC, not the average.
Common mistake: starting the batten frame from ground level instead of the DPC mark, which traps rainwater splash-back against the timber and rots the bottom row within 18 months.
2. Fix the vertical battens
Mark batten centres at 400mm using the chalk line, then drill and plug into the brick or block face only — never into mortar joints, which don't hold long-term load. Use 75mm fixings minimum, driven through the batten into solid masonry, and check each batten with the spirit level before moving to the next.
This step sets the whole finished look, so take the extra ten minutes per batten to get it plumb. A batten that's 5mm out at the bottom is 20mm out by the time you reach a 3 metre wall.
3. Staple the breather membrane
Roll the membrane horizontally across the battens, overlapping each row by 100mm, and staple through into the battens only. This layer stops wind-driven rain reaching the masonry while still letting trapped moisture vapour escape outward — reversing the direction (using a vapour barrier here instead) is the second most common failure in cladding jobs.
Expected outcome: a taut, wrinkle-free membrane with no gaps at overlaps.
4. Add counter battens for the ventilation gap
Fix horizontal counter battens over the membrane at 600mm centres, creating the ventilated cavity that lets the timber behind the panels dry out after rain. This gap should be a minimum of 25mm — thinner than that and airflow stalls, which is exactly the trapped-moisture scenario the whole system is meant to prevent.
5. Fit the starter trim and first row of panels
Mount the finishing trim along the bottom edge, level with your DPC mark, then click or screw the first row of cladding panels into it. Work left to right, checking level every third panel rather than every one — small errors compound, so catching drift early saves re-cutting later.
Common mistake: skipping the starter trim and screwing the first row directly to battens, which leaves no drip edge and lets water track back under the panel.
6. Continue the run and stagger joints
Build up each row, staggering vertical joints between courses by at least one batten width so you don't end up with a continuous seam running top to bottom. Stagger joints also spread any minor expansion movement across the wall instead of concentrating it at one weak point.
7. Finish corners, reveals, and the top edge
Use corner trim pieces at external and internal angles rather than mitring panel ends on site — factory-cut trims give a tighter, more weatherproof joint than a hand-cut mitre. Cap the top row with trim that overhangs slightly to shed water away from the wall face.
Expected outcome: a clean, ventilated cladding system with no exposed batten ends and no fixing points visible from ground level.
Troubleshooting
| Problem | Likely cause | Fix |
|---|---|---|
| Panels bow outward after a few months | No ventilation gap, or gap under 25mm | Remove affected panels, refit counter battens to correct depth |
| Damp patch appears on inside wall | Cladding bridged the DPC | Cut cladding back to 150mm above DPC line, refit starter trim |
| Fixings pulling out within a year | Screwed into mortar joints, not brick | Redrill into solid masonry, use 75mm+ fixings |
| Green staining or algae on north face | No airflow behind panels, shaded elevation | Check counter batten spacing, consider heavier membrane |
| Panel edges warping at joints | Fixings too tight, no expansion allowance | Back off screws slightly, leave 2-3mm gap at butt joints |
| Water tracking under bottom row | Missing or badly seated starter trim | Refit trim with a slight forward lean to shed water |
Tools and resources
- Masonry drill with SDS function and 6-8mm bits
- 1.2m spirit level and chalk line
- Stainless steel fixings rated for exterior masonry use
- High tack panel glue, 290ml for securing trim joints where mechanical fixing isn't practical
- A helper for panels over 2.4 metres — solo fitting above head height risks both panel damage and personal injury
- Read how to fix exterior cladding around windows and doors before you reach any openings — reveals need their own trim sequence and it's easier to plan for them before the first batten goes up
What to do next
Once the cladding's up, the job isn't finished until you've got a maintenance routine. Panels fitted correctly in 2026 with proper ventilation should need nothing more than an annual check of fixings and drip trims, but skipping that check is how small problems become full re-clads. See how to maintain exterior wall cladding panels for the yearly checklist.
FAQ
Can you fit exterior cladding directly onto a cavity wall without battens? No — direct fixing onto render or brick blocks the ventilation gap the system needs and traps moisture behind the panels within one wet season. Battens and a ventilated cavity are non-negotiable on a cavity wall in the UK climate.
How far above the DPC should exterior cladding start? At least 150mm above the damp-proof course line, measured from the highest point of the DPC on uneven older walls. Starting lower risks rainwater splash-back rotting the bottom row of panels.
What fixings work best for exterior cladding on brick? Stainless steel or A4-grade fixings driven at least 75mm into solid brick or block, never into mortar joints. Mortar doesn't hold long-term load and fixings will work loose within a year or two.
Do I need planning permission to clad an exterior wall in 2026? Most single dwellings don't need planning permission for cladding under permitted development rules, but listed buildings and conservation areas usually do. Check with the local planning authority before ordering materials if your property falls into either category.
How much ventilation gap does cladding need behind it? A minimum of 25mm between the breather membrane and the back of the panel, held open by counter battens at roughly 600mm centres. Anything tighter stalls airflow and defeats the point of the ventilated system.
Is oak-finish cladding suitable for a north-facing wall? Yes, as long as the ventilation gap is correct — shaded north elevations are more prone to algae growth if airflow is restricted, not because of the finish itself. Check drainage and gap depth on shaded walls more carefully than sunny ones.
How long does cladding a single wall elevation take? A competent two-person team can batten, membrane, and clad a standard semi-detached elevation in a day, with a second day for trims and corners. Uneven render underneath adds time for packing out battens level.
Can cladding be fitted over existing render? Yes, provided the render is sound with no cracking or hollow patches — battens fix through render into the masonry behind it. Any render that sounds hollow when tapped needs repair before battens go up.
One last thing
Most failed cladding jobs aren't caused by the panels — they're caused by a 15mm-too-thin ventilation gap that nobody checks until the boards start bowing two summers later. Measure the counter batten depth with a tape, not by eye, before the first cladding row goes on; it's the cheapest five minutes in the whole project.
Share:
Best Exterior Cladding for Flat Roof Garden Room 2026
Wall Panels for Developer Show Homes: 2026 Buy Guide